Why Laravel 8 Framework?
First of all we need to know why laravel is popular and why should we choose laravel for our web project? Here are some of the great benefits that laravel offers and you will realize how benificial is to use Laravel framework for your next web development project.
- Over 1.1 million websites worldwide are built using Laravel
- Very simple to learn and understand
- Highly secured
- Better website performance
- Great for high traffic handling
- Easy to integrate third-party libraries
-
Framework Features
- Blade template engine for views
- Eloquent ORM for database interactions
- MVC in nature
- Object Oriented
- In-build Authentication
- Automated Unit Testing
- Automated Task Scheduling
- Open source and wider community to support
How and where to start as beginner?
Learning new things are not easy for sure however Laravel is pretty easy to learn and understand. In this tutorial I will walk you through some of the basic concept of Laravel and we will learn some of the basic build blocks that is needed to develop any web project.
Things to learn:
- How to install laravel framework?
- Understanding MVC concept
- Creating first page using Laravel
How to install Laravel Framwork?
Let say that you got a new computer and you do not know where to start. First thing we would install on your computer is Docker. Why we need docker we will understand in a bit. Go ahead and click link below and download docker for your machine:
Why did we install docker?
Let say that you want to create a blog website. What things do you need in order to run your blog website?
- PHP: a software language
- Laravel Framework: mvc framework like laravel that depends on php language
- Server: a webserver like apache or nginx that runs your website
- Database: a database to store your blog data i.e. mysql
You can install all of above on your local machine however it is difficult to manage different versions of above libraries and you may get compatibility issues. Docker can help us create a virtual containers where we can install above dependencies.
Later you can scrap this containers if you do not need above libraries with single command rather then uninstalling things individually. Let say that our blog site needs following libraries.
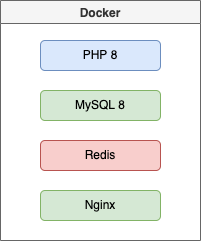
We will install all of above dependencies using a Laravel tool called sail. Sail is a laravel command line utility based on docker which would allow us to install and manage different libraries or tools we need for our laravel project.
Go ahead and click below link to install Laravel project using sail:
I assume that you read my article on sail and now have little understanding on sail. You installed laravel framework using sail commands I mentioned in above article.
Understanding MVC concept
The second step after we learned about installation is to learn basic concept of MVC. MVC stands for Model, View and Controller. As a beginner you need to understand how request/response cycle works.
Let's look at following diagram:
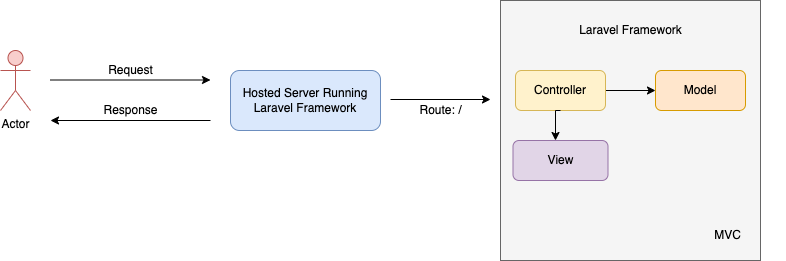
When a user browse any website a request is made via browser to remote server. A remote server basically running Laravel application. Remote server respond with some data as a response.
We need to understand how laravel handles this request and responses. Let say that a user types a url https://learn2torials.com to web browser like chrome. Following diagram shows how this request is travelling under the hood using laravel framework.

Laravel framework first parses the url using router. In laravel every route is tied to specific controller method. Let say that laravel finds your route and then it creates a request object and sends this request to laravel controller.
A laravel controller is basically a controller class which has different method each tied to specific route. Once request goes to controller method. It can perform different tasks as below:
- It takes request object
- If it needs to talk to database it calls the model class and gets the data
- it then sends data to a view, view is basically blade template file contains html
- view parses all the data where needed in the view and returns back to controller
- controller then creates a response class and sends the request back to user
If you are still confused with MVC concept don't worry I will show you how this works practically in few minutes.
Creating your first page using Laravel
Let's create a sample page to understand MVC concept in Laravel. As we know a route is basically url that we type in a web browser which is tied to specific controller method.
Let say that when user hits https://yourblog.site we want to show user a welcome message. We first need to create a route in laravel. All routes are defined in routes directory.
Because our users are using web browser our request is web in nature therefore open routes/web.php file in your favourite editor and let's define following route.
use App\Http\Controllers\HomeController;

Route::get('/', [HomeController::class, 'index']);
By defining above route in routes/web.php we are telling laravel that whenever user goes to / url in their browser send this request to HomeController@index method.
At this point we do not have a controller. Let's create a HomeController. Open your terminal window and type following command:
# go to your laravel project directory
cd example-app

# create a new controller
./vendor/bin/sail artisan make:controller HomeController
Above command will create a controller file called HomeController in app/Http/Controllers directory.
Open HomeController file and let's create index method which ties to our route as shown below:
<?php

namespace App\Http\Controllers;

use App\Http\Controllers\Controller;

class HomeController extends Controller
{
    public function index()
    {
        // you can call some model here
        // store data in a variable and
        // pass this data to your view file

        // passing data to view file
        return view('home/index', [
            "message" => "Welcome to my blog"
        ]);
    }
}
Now, we have defined controller method which returns view method. First argument for view method is the name of the view and second argument is the data that you want to pass to your view file.
Now, we have to create our view file. Create a new file called index.blade.php in resources/views/home folder. Open resources/views/home/index.blade.php file in your favourite editor and add following code to your file:
<h1>{{ $message }}</h1>
So far we have done following things:
- Defined a route that points to a specific controller method i.e. HomeController@index
- Defined a controller with index method
- Defined a view file which is called from controller index method
Now, if you go to your browser and type http://localhost you will see Welcome to my blog message.
What should I do next?
At this point you are very beginner with Laravel framework you should practise following things to sharpen your skills and to become intermediate or advanced developer:
Intermediate developer:
- practise more on how to create different routes, models, controllers and views
- understand how many different ways you can create routes
- understand what methods and objects are available in controller class that you can use
- what things you can pass to your view file and how you can parse this data
- how to create models and how to use them in controller classes
- what is env and config files?
- Laravel Sail
- Form Validation
- request/response cycle
- Laravel Views
Advanced developer:
- learn about middlewares
- error handling
- artisan commands
- background jobs or queues
- localization
- package development
- modular concept
- Authentication based on roles
- asset management
- sessions
- caching techniques
- rate limitting
- notifications
- api/model resources
- Unit Testing
- Model Scopes
- View Composers
- build production docker image for laravel
I know it is lot to learn but with regular practise and going steady you can be a better developer. Do read my articles on Laravel framework for advance concepts and sharpen your skills.
Laravel developers are well paid now a days you need to have right knowledge about laravel framework and its concepts. Feel free to message me via contact form if you have any concerns or need any idea on what to learn next.
Do share my articles and motivate me or like them.