Laravel's resource classes allow you to expressively and easily transform your models and model collections into JSON.Basically you can generate a nice json formatted data right from Eloquent.
Let’s learn how to generate api resources.Consider you have a user table in your database and you want to generate api resources for your User model.Run following command on your terminal window while being on laravel project root directory:
php artisan make:resource User
Above command will generate a new resource class in app/Http/Resources folder.
Let’s have a look at generated class:
<?php

namespace App\Http\Resources;
use Illuminate\Http\Resources\Json\JsonResource;

class User extends JsonResource
{
    /**
     * Transform the resource into an array.
     *
     * @param  \Illuminate\Http\Request  $request
     * @return array
     */
    public function toArray($request)
    {
        return parent::toArray($request);
    }
}
Resources deals with the single model which means a single row in the database. To represent multiple records or collection we need to create resource collections.
How to generate resource collection?
To generate a resource collection run following command from your terminal window while being in the root directory of your laravel project.
php artisan make:resource UserCollection
Above command will generate a new file called UserCollection in app/Http/Resources folder. Let’s have a look at the contents of the generated file:
<?php

namespace App\Http\Resources;
use Illuminate\Http\Resources\Json\ResourceCollection;

class UserCollection extends ResourceCollection
{
   /**
    * Transform the resource collection into an array.
    *
    * @param  \Illuminate\Http\Request  $request
    * @return array
    */
   public function toArray($request)
   {
       return parent::toArray($request);
   }
}
When returning data from the resource you can control the attributes. You can display or hide some data when responding from your controller.
Let’s make some changes to our User resource file and add some attributes that we want to display.
<?php

namespace App\Http\Resources;
use Illuminate\Http\Resources\Json\JsonResource;

class User extends JsonResource
{
    /**
     * Transform the resource into an array.
     *
     * @param  \Illuminate\Http\Request  $request
     * @return array
     */
    public function toArray($request)
    {
        return [
            'id' => $this->id,
            'name' => $this->name,
            'email' => $this->email,
            'created_at' => $this->created_at,
            'updated_at' => $this->updated_at,
        ];
    }
}
Every resource class defines a toArray method which returns the array of attributes that should be converted to JSON when sending the response.
Notice: that we can access model properties directly from the $this variable.
Let’s see in action how we can use this updated User resource to display as a json response. We need to have a route and a controller to play with our resources. Let’s define a new route that will display user record. Open your routes/web.php file and add the following route:
Route::get('user/{id}', 'UserController@index');
Once we have a route setup let’s generate a new UserController using following command:
php artisan make:controller UserController
This command will generate a blank UserController in app/Http/Controllers folder. Let’s open the file and add following index method.
<?php

namespace App\Http\Controllers;

use App\User;
use Illuminate\Http\Request;
use App\Http\Resources\User as UserResource;

class UserController extends Controller
{
   public function index(Request $request, $id)
   {
        // find a give user from
        // eloquent user model
        $user = User::find($id);

        // pass this single user object
        // to user resource remember resource
        // deals with single eloquent model or row in database
        return new UserResource($user);
   }
}
Let’s understand what we are doing here:
- First of all our route takes one argument called id
- Our controller index method takes this id and gets single eloquent model
- We pass single user model to our UserResource
- Our resource now renders attributes we defined in the resource class and outputs as a json data
Let’s run our code in browser open your terminal window and hit following command to run our web server.
php artisan serve
Open your browser now and go to http://localhost:8000/user/1. You will see the following output on your browser.
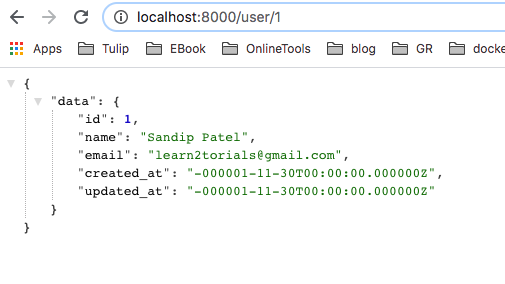
Note: you will see different output depending on your database record.
This is pretty cool right resources help you to output your data in a json manner. If you are building restful api laravel resources are great place to start. You will realise how small you write code and your controllers are clean. Now, let’s learn about how we can deal with resource collection.
As I mentioned earlier collection represents multiple records in the database which means it handles multiple resources. We learned how to handle single resource however now we will deal with multiple resources.
Let’s create another route and define a new controller method to output our resource collection. Open your routes/web.php file and add following new route along with previous route.
Route::get('users', 'UserController@list');
Route::get('user/{id}', 'UserController@index');
Great, let’s now update our UserController with following new method:
<?php

namespace App\Http\Controllers;

use App\Http\Resources\UserCollection;
use App\User;
use Illuminate\Http\Request;
use App\Http\Resources\User as UserResource;

class UserController extends Controller
{
   public function index(Request $request, $id)
   {
       // find a give user from
       // eloquent user model
       $user = User::find($id);

       // pass this single user object
       // to user resource remember resource
       // deals with single eloquent model or row in database
       return new UserResource($user);
   }

   public function list(Request $request)
   {
       // get all user records
       $users = User::all();

       // pass all eloquent objects to user collection
       return new UserCollection($users);
   }
}
Let’s now hit this new route on our browser at http://localhost:8000/users. You will see the following output:
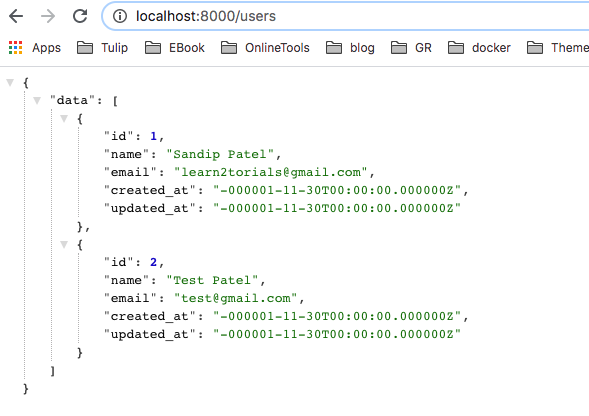
You will notice now that our data is an array representing multiple UserResource object. UserCollection is smart enough that it knows it has to output multiple UserResource objects.
If you want to add additional information with your collection you can always do that. For example, adding pagination and limiting your collection output.
Let’s have a look at how we can add pagination to our UserCollection. Open your UserCollection and update your class with the following new information:
<?php

namespace App\Http\Controllers;

use App\Http\Resources\UserCollection;
use App\User;
use Illuminate\Http\Request;
use App\Http\Resources\User as UserResource;

class UserController extends Controller
{
   public function index(Request $request, $id)
   {
       // find a give user from
       // eloquent user model
       $user = User::find($id);

       // pass this single user object
       // to user resource remember resource
       // deals with single eloquent model or row in database
       return new UserResource($user);
   }

   public function list(Request $request)
   {
       // get all user records
       $users = User::paginate();

       // pass all eloquent objects to user collection
       return new UserCollection($users);
   }
}
We changed our controller list method and added paginate method instead of returning all records. Laravel resource collection is smart enough to understand paginate method so that we won’t need to change our UserCollection class.
Let’s see what is changed in our output while hitting our request at http://localhost:8000/users.
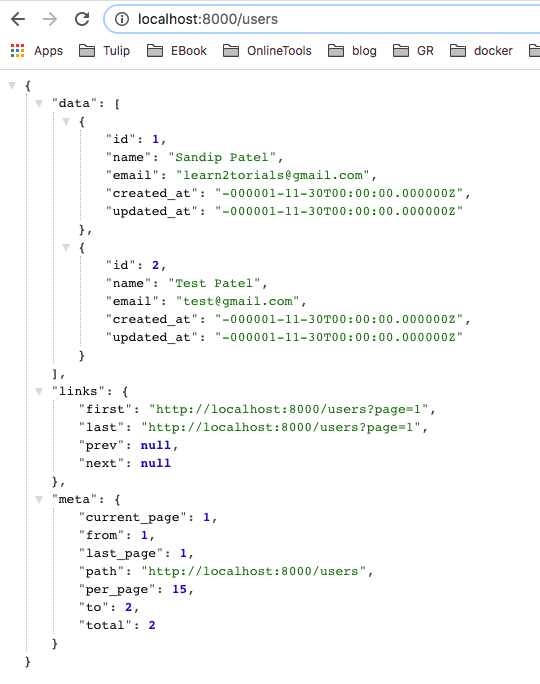
Cool, right it knows what it has to output. You have enough metadata to know about your pagination attributes that you might need.
To learn more in depth about the following concepts:
- How to include Eloquent relationship in your resource
- How to add additional conditions to control what fields to display or hide
Checkout laravel link below to learn more in depth:
I hope now you have a clear understanding about laravel api resources. If you like this article please share your love by hitting heart icon below.