In our last blog we learned basics about vuejs 3 component.
In last tutorial we learned that props are being passed to component and they are read only attributes. You can use props in component template tag but you can not modify them.
However, states are internal variables within a component which can be modified and use by template tag. Let's look at the following diagram to better understand this concept:
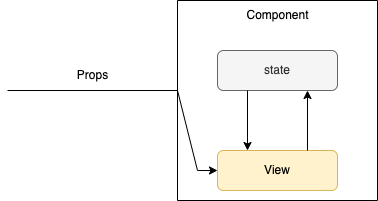
State is basically an object which stores data that component may need. Let's take an example let say that you have a component which has a count button.
When you click on the count button you want to increment your counter. You can not pass a prop to a component and then increment it because props are read only variables.
To make your component work you have to declare a state variable and add event to a button so that when button is clicked you update your state variable.
Once state is updated it renders your view with updated information. Let's look at the following code:
First of all we need to understand concept of reactivity in vuejs then I will explain step by step code that we have written for our counter component.
Vue component state is made up of reactive javascript object which make state management simple. When vue detect changes in state object it will immediately update view to reflect these new changes.
Let's declare a reactive state first in our code we first import reactive from vue library:
import { defineComponent, reactive } from 'vue';
In vue3 setup function is introduced which makes our life more simpler. Let's take a look at the following code we have wrote:
  setup() {
    const state = reactive({
      counter: 0,
    });

    const onIncrement = () => {
      state.counter++;
    };

    const onDecrement = () => {
      state.counter--;
    };

    return {
      state,
      onIncrement,
      onDecrement,
    };
  },
Setup function is called first in this function we first declare our reactive javascript object and call it state you can call it anything but I call it state just so that we understand concept of local state.
This state object contains a key called counter with initial value of 0. Then we have written two more functions one that increments the state and other that decrement the state.
Finally, we have to return our state and functions that we have declared so that we can call them from our view. If you do not return variable or functions that you define in setup function you will not be able to use them in your view.
Finally, let's call these variables from our view template tag as shown below:
<template>
  <h1>{{ message }} {{ state.counter }}</h1>
  <button @click="onIncrement">Increment</button>
  <button @click="onDecrement">Decrement</button>
</template>
You can see in above code message is a prop that is being passed from App component and act as readonly variable. You can not update message in setup function or you will get an error.
Secondly, we add click event on the button and call appropriate functions. We also add counter state variable right beside our message prop.
If we run this code you can see that whenever you click the button it calls functions declared in setup function and updates the state of component.
When component sees that state is updated it renders these changes in the view and therefore your browser shows you updated value of your counter state variable.