Compose is a tool for defining and running multi-container Docker applications. You can create a single docker compose configuration yml file that defines list of your container services.
Followings are some of the benefits of using docker compose:
- Compose works in all environments: production, staging, development, testing, as well as CI workflows.
- With a single command, you create and start all the services or containers
- You can define common networks and volumes for your containers
Consider that you are working on a bigger project where you are dealing with multiple containers. Using command line it would be very difficult to manage multiple containers rather using docker compose you need to remember few commands to manage all your services.
How does docker compose work?
Using Compose is basically a three-step process:
- Define your app’s environment with a Dockerfile
- Define the services that make up your app in docker-compose.yml so they can be run together in an isolated environment.
- Run docker-compose up and Compose starts and runs your entire app.
Followings are some of the commands that we will use for our tutorial:

Creating a project using docker-compose
Let's learn how we can create an application using docker compose. Imagine we are building a website where we show number of visits each time a user visits our website for our example we will be using following two services:
- NodeJs
- Redis
Let's understand this by diagram:

To create multi-container service we will follow the steps below:
- We will create a custom docker image for our node server
- We will use existing redis docker image from docker hub
- We will define these two services in our docker-compose.yml file
- We will use docker compose commands to create or destroy our containers
Let's create a new folder and start adding package.json file first.
{
  "dependencies": {
    "express": "*",
    "redis": "2.8.0"
  },
  "scripts": {
    "start": "node index.js"
  }
}
In our package.json file we have added two dependencies that we require for our project. Now, let's create a index.js file that define a route and a redis logic to increment our visits.
const redis = require('redis');
const express = require('express');

const app = express();
const client = redis.createClient({
  port: 6379,
  host: 'redis-server'
});

// Set default visits
client.set('visits', 0);

// increment visits on each
// visits of the user
app.get('/', (req, res) => {
  client.get('visits', (err, visits) => {
    res.send('Total Visits: ' + visits);
    client.set('visits', parseInt(visits) + 1);
  });
});

// listen on 3000
app.listen(3000, () => {
  console.log('Listening on port 3000');
});
Now, we will define Dockerfile to create our custom nodejs docker image that we will later on use in our docker-compose.yml file.
Open your terminal window and create a new file called Dockerfile with following contents:
# get the base image
# from docker hub
FROM node:alpine

# define a working directory
# for our container to use
WORKDIR /app

# copy package.json file to our working dir
COPY package.json /app

# install our dependencies
RUN npm install

# copy other files
COPY . .

# run a startup command
# to run our application
CMD ["npm", "start"]
So far we have following files in our project:
- package.json
- Dockerfile
- index.js
Finally, we will create a docker-compose.yml file which defines our containers. Create docker-compose.yml file with following contents:
version: '3'
services:
  redis-server:
    image: redis
    container_name: redis
  node-server:
    build: .
    container_name: node
    restart: always
    ports:
      - '8080:3000'
Let's understand our docker compose file syntax:
| Variable | Defination |
|---|---|
| version | version of docker-compose that we are using |
| services | List of containers that we are going to create |
| image | base image that we use from docker hib |
| container_name | a user friendly name of our container |
| build | location of Dockerfile |
| restart | what should we do in case our container fails? |
| ports | mapping container port to our host port i.e. HOST:CONTAINER |
So far we have all necessary files that we need in order to create containers using docker compose. Make sure you have docker installed on your machine before you are able to run following commands:
# create and start our containers
# keep in mind -d option runs container in background
docker-compose up -d

# list of all our running containers
docker ps

# check process logs for our node app
docker logs -f node
Once you run all of the above commands you will have a running application on your local machine at http://localhost:8080/
Let's review our index.js file and find following line of code:
const client = redis.createClient({
  port: 6379,
  host: 'redis-server'
});
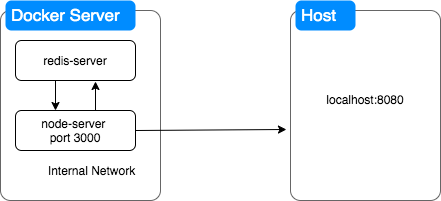
Please note that we did not use 127.0.0.1 as our redis host however we used redis-server string. The reason why we did this because:
- Our containers are isolated
- They do not know about each other
- Docker compose creates a default network for both containers
- This network allow both container to access each other using their service name as the host name
- Find our service name for our redis container . i.e. redis-server
Consider following diagram to clearly understand between your computer (host) and docker server (docker client).

Following are some important considerations while working with docker:
- Your host machine or localhost does not have direct access to containers
- There are two ports a local port for container and a host port
- To access specific port within a docker container you need to define ports block in docker-compose file.
I hope I was able to explain about how to create multi-container app using docker compose. To destroy your running containers run following command:
docker-compose down
Source Code
Source code for this tutorial can be found on github. Click the link below to download the source code.